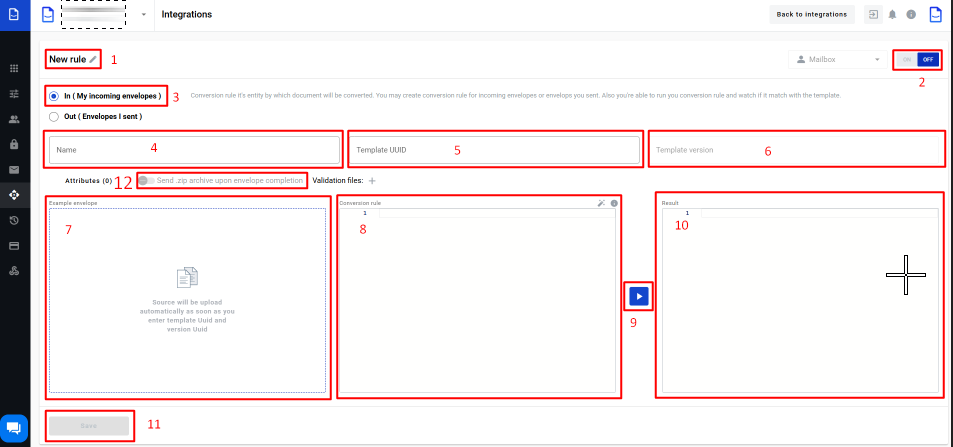
- To create a conversion rule for the incoming document, the client should select the checkbox (3)
-
In field (1), the user can provide a rule name or leave the default name
-
In field (4), the client should provide a name; this name will be part of the full name for all converted documents. The full name will consist of the name from field (4) + the time when this document was converted, if a document with a similar name has already been created. You can customise the name using special variables for a naming pattern:
{mailboxUuid} - mailbox UUID that is using the integration functionality
{envelopeUuid} - envelope UUID of the envelope that has been created on the platform
{randomNumber} - random number
{templateUuid} - template UUID on the platform, using which the envelope has been created
{date dateFormat} - date of the envelope receiving in the format you need (dateFormat can be DDMMYYYY or any of the available date formats)
{“documentId”:”fieldName”} - value from the specific document of the template version used in the integration rule.
- In field (5), the client should provide a template UUID which matches to incoming document
- Field (6) will be auto-filled with the last template version. If needed, the client can use not the last template version, for that need to click the template version input (6), after that, an open list with all template versions, you can select the necessary template version from this list. When fields (5) and (6) are filled, field (7) will be filled with autogenerated data. If the client wants to change data in the field (7), he should update a particular template and select the necessary template version
- In field (8) need for an input conversion rule which will be used to convert all incoming files. If needed, the client can update the conversion rule inside this field (8)
- When fields (7) and (8) are filled with correct data, the client can check the conversion result. They need to click the Execute (9) button, and after that, in block Result (10) will be shown a document example after conversion
- If the execution finished with success, you can save a new conversion rule; for that need to click the Save (11) button
- You can enable the conversion rule from this page by moving the toggle (2) to the left side and clicking the Save (11) button. After that, all incoming documents will be able to use this conversion rule
Conversion rule info
You might want to receive the envelope archive to your server according to the protocol you’ve chosen.

-
Enter the template UUID you want to integrate with
-
Set toggle (12) in active state to activate ZIP archive functionality
-
Choose the archive type you want to send as soon as the envelope is COMPLETED